Sunday, June 20, 2010

Hunter Green Lace


In honor of Father's day, this post is about my dad. Anyone who knows my dad knows he loves to decorate in hunter green. He has a house in Colorado Springs that came with a lace curtain on the glass door that seperates the living room from his bedroom. He thought it looked nice in his old (circa 1890's) house, so he put up lace mini blinds in the rest of the house. When he went to refinish the house in Westcliffe, he added glass doors to his bedroom and planed on putting lace curtains there too. The first attempt by another nameless person resulted in the curtain being way too short. She gave up, so only one of the two doors had a curtain, which as I said was too short. His house stayed this way for years. While I was up there, I suggested that I could do curtains for the door no prob. He said I've hear that before but he said go ahead anyway. I asked what color he would like and he said white or perhaps tea stained. After a little chat about colors of lace I mentioned that he could get lace in hunter green. He was completely shocked at this revelation and told me to go for it. It took a week for the fabric store to get the 5 yard I needed, but it was worth the wait. I sewed them last weekend, and they both are finished and both fit. I did make them a little on the short side so that the lace would stretch and not bag.

This is the bedroom side...


and this is the office side.

Now he needs a quilt for his bed, and this room will be all decorated!

Wednesday, June 16, 2010

Another Purse

I made this purse for my good friend Teresa. I made a little sack for her to carry her prayer book and beads about a year ago out of this same fabric, so it seemed logical to make a purse too.


For the little bows on the side, I used braided satin cording. It has a great look, but once she started using it, we discovered one big drawback: the satin bows are forever coming undone. Fortunately, another of her friends fixed this problem with 2 small safety pins. In the future, I think I would like to try using ribbon or other materials or the ties, but I do plan on avoiding slippery materials.


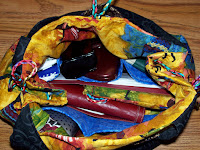
The pockets in the purse make it super handy for storing all the necessary things. I wanted to take a picture of the purse full so you can see how much this seemingly little purse carries and organizes.

Monday, June 14, 2010

Karli's Wedding Dress

My friend of almost 5 years now, Karli, is getting married on Sept. 4, 2010. Last year, we spent a bunch of time looking on the internet for a wedding dress with red in it. Through months of searching, nothing was quite right. There was one white dress that was close, but she was really wanting to have some red (and not just a sash). So, I finally said I will just make her one. She wanted a red lace overlay with an A line and empire waist. I am close to finished, but I can't do many of the finishing details until I fly out to see her the week before the wedding (like the hem, getting the shoulder straps the right length and doing the bustle).


Please forgive the white t-shirt on my dress-maker's dummy. My dummy is rather old (it was my grandma's and is at least 50 years old), so I did not want to get the wedding dress dirty.


Here is a detail of the pearls on the bottom of the lace overlay. The bride is wearing a pearl necklace that her brother gave her and several other pearl accents. The straps on the dress are also covered in pearls and beads.


Another feature Karli wanted in her dress was a lace-up back. We are both hoping that this feature will help avoid extra alterations when I arrive the week before the wedding. We live about 2,000 miles apart, so fitting it at the last minute will be interesting!


As long as I was making "The Dress" it seemed fitting to make the flower girl dress to match. The dresses are not quite identical, but really rather close. One difference is the pearl flowers, which add a "little girl" element to the dress. The bridal gown has a more elegant bow in front instead.

I imitated the lacing in the back, but given how young the flower girl is, I did not think it was a good idea to try to lace her in. I put an invisible zipper on the right side so she would look the same, but the dress would be way easier to put on and take off. I also have to wait for the fitting on this dress, so hopefully going out a week early will be enough time. I will post again to show the dresses finished and on the right people.

Purse


Well, I have made several purses now, but I keep neglecting to post them. Here is one I made for my mom using the "Bow Tucks" pattern. She picked the fabric without knowing where each piece would go. I think it turned out to be quite charming.


The inside has a nice retro flower design, many pockets and a stiff teal purse bottom.


This view shows off the little bows on the sides, which is where the "Bow Tucks" pattern gets its name. I did alter the pattern to make the handles longer on this purse because my mom hates having short-handled purses.

This photo shows some of the fancy stitching and quilting the purse has.


My mom also picked out this cool stone button.

Tuesday, January 19, 2010

Rhonda's Quilt


So I finished a couple of things, but I will post them some other time. This is a wall quilt I am making for my Godmother, Rhonda. She decorates her office and house for the seasons, and has an open space just begging for a quilt in her office. I made this quilt to represent the 4 seasons, so it will match the season, no matter what the season is. The spring block is made of lilac and aqua, the summer has two shades of green, the fall is orange and rust and the winter is white and icy blue. The background is a sky blue, representing the blue sky present in all the seasons. The fabric is a pearlized cotton, which shimmers in the light. I am going to quilt it with a pearlized thread as well.


Spring


Summer


Fall


Winter

Please forgive the creases and bad lighting. I will post again when it's finished.

The construction of this quilt was rather different than what I normally do. It called for 4 9-patches that were sewn together along with a 3" border and then cut again to form the pinwheel design. It was a little more effort per block, but it turned out so nicely, I am sure I will do it again.

I will post again with the finished quilt when it is done. It looks like it might be about 24-26" square, depending on how I bind it.

Wednesday, July 15, 2009

Nandoc's King Quilt

This post is long overdue. I actually finished this quilt well over a month ago, and Nandoc already has it. For those of you thinking, gee, Nandoc is a funny name, let me explain. When I first posted this blog I shared it with some of my on line friends who play Final Fantasy XI. Nandoc is the screen name of a friend who saw my quilts and wanted to special order a king sized quilt.

This quilt is made of random blocks in 5 colors: brown, cream, dark blue, hunter green and burgundy. Nandoc wanted it to have an earth-tone feel with mostly shades of brown and cream. This quilt was also intended for a man, so she wanted it to be mostly tone on tone patterns without any flowers. I ended up picking 4 fabrics each of brown and cream and 2 each of the blue, green and burgundy. The border adds a bit of a punch by using a cream and brown speckled very dark blackish-brown fabric to separate the blocks from the strips.


I was originally going to tie this quilt because I wasn't sure my regular-sized sewing machine could handle quilting such a large quilt. After a disappointing trip to the store where nothing seemed right to tie it, I finally decided to take a leap of faith and quilt it on my small machine. I found a very nice variegated dark brown to cream thread which I used for the top stitching and then a matching cream color for the backing. The quilting is a diamond pattern with the border stitched in the ditch. You can see that in this first picture I haven't quite finished the quilting and it doesn't have on the brown binding. I laughed so hard when I first noticed my puppy, Arya (pronounced ARE-ee-uh, like the Italian Aria but from the book, Eragon) looking really sad in at me because I wouldn't let her run all over the quilt.


This second picture is the finished quilt on my dad's king sized bed.

(Random 3" blocks, strip border approximately 114" x114" 2009)

Wednesday, March 4, 2009

Sneak Peek

I've been working on some new quilts, and even thought they are not done, I thought you may like to get a sneak peek. This first one is for my brother. It took us quite a while to pick out the fabric, but we finally settled on a "Nobel's Tunic" themed quilt (inside ffxi reference). This is the second time that I have done a water color quilt. The borders will be the second darkest yellow, the darkest blue and the silver speckled white.

This appliquéd quilt has a lot that needs to be done still. I'll have to take another picture when it's light outside because the colors are much brighter than is shown. This quilt is actually a block-of-the-month. Most of the months were sold out when I got the remainders, so I only have six of the twelve blocks. I need to add purple borders that match the purple sashing and sew around each of the appliqués. I want to get the batting and backing first so I can quilt through all the layers so the butterflies, flowers etc. are on both sides.


This quilt is going to be a little strange in size. I will probably call it an extra long full.

Friday, February 27, 2009

KJ's Wedding Quilt

So, I am going to begin by stating that I really hate this camera. I will be changing this post when I can use my normal camera that takes decent pictures.

This quilt is a gift for my friend KJ, who just got merried on Feb 7, 2009. I am a little late in finishing it, but I think she'll forgive me. She requested a queen sized burgundy and black quilt after I convinced her I would not take no for an answer. You may notice that the middle black fabric has treble clefs and notes on it. I did this on purpose because KJ was a fellow music student with me, and now she teaches k-5 music and accompanies on piano.
I had a difficult time picking out the fabric for this quilt. Burgundy must not be a popular color this year because there were practically no bolts of burgundy fabric, and the ones that were there were uglier than I've seen in a long time. I ended up with a rusty-burgundy for the darkest shade and worked to a pale rose. The second dark proved to be a big problem. It really wanted to pop out and take over the quilt. I was originally going to do a barn raising lay out for the blocks, but the second dark was just obnoxious in this lay out. I tried several other lay outs and finally settled on the pinwheel because it made the last dark the primary color, which is what I had intended for this quilt. The three black fabrics are actually in the "light" position. I did this so that the black fabric would be a little less oppressive. I also added the quilting in the rusty rose color to help tone down the depth of the blackness. I seem to have a problem with queen-sized quilts. They always end up turning out huge. This quilt is no exception, and could be on a king-sized bed if she chose.

(Log Cabin, Pinwheel Layout approximately 98"x120" 2009)

Monday, February 23, 2009

Bunny Table Runner


This is my latest creation. The original design called for cut-out circles in the center of the pinwheels and appliqué flowers on the ends with the bunnies. I thought it looked kind of strange, so I opted to use yo-yo's for the center of the pinwheels instead.

I didn't quite use normal yo-yos. Instead, I pulled some of the fabric from the back through the hole on the front. I think it makes the yo-yos look a little more like flowers. I like how the back side of the fabric is a little lighter than the front side, so the center of the flowers match, but are still different.
I plan on selling this table runner as well. I think this is the perfect time of year, with Easter coming up. Again, if you are interested in this table runner, I will be putting it on sale through e-bay for $60. E-mail me if you are interested.

(Bunny Table Runner approximately 15"x40" 2009)

Sunday, February 22, 2009

Cranberry & Sage Kitty Crib Quilt


This quilt is my first attempt at making a quilt strictly to sell. I fell in love with the "Calico Cat" fabric, and knew I wanted to make a quilt using it. The pattern I used for this quilt was actually called "Little Sailor's Dream," though honestly there was nothing in the quilt that made it look like a sailor's quilt except the accessories that you could sew to go with the quilt.

This is a close up of the quilting. I did a very simple diamond pattern. I like the effect because it breaks up the large kitty block and makes it look like several different blocks rather than just the two blocks that were used in this quilt.
This is a picture of the quilt on my dad's antique crib. This crib is much smaller than the standard size today, so the quilt is actually facing the wrong way. The color in this picture is a little whiter than the quilt is, but I really like how it looks with the crib. I plan on charging $85 for this quilt. I will either try e-bay or one of the crafting sites my friends from Seishou suggested. If you are interested in this quilt, you can send me an e-mail at sewhoneybee@hotmail.com before I put it up for auction.

(Sailor's Dream 37"x49" 2009)

Tuesday, February 17, 2009

Jewel Tones

Log Cabin quilts are my favorite to make because they can look so different depending on the layout and the colors. This is a work-in-progress that I am making for my aunt. The blocks are in a pinwheel pattern which really makes this quilt pop.

This is a a close up of the quilting I am adding. Each block has a different free-hand flower surrounded by stippling on the yellow side, and the jewel tone side is stitched 1/4 from the ditch with aqua thread.

(Log Cabin Pinwheel 96"x108" work in progress)

Pretty in Pink

Another friend, another baby. This quilt features Strawberry Shortcake and textured cottons. I love how this quilt looks as if it could have been made 25 years ago; it reminds me of being a kid again. I think the textures of the fabrics, the yarn ties and the lace help make this both beautiful and interesting for the baby to touch.

The Making of a Quilt

Making a quilt starts with color. In this quilt, I was helping solve marital differences of taste in a way that made both parties happy. Maria loves the color yellow and wanted a bright, sunshiny bedroom. Adam loves green and especially likes the dark avocado to olive green and wanted an earthy feel. At first, we all thought that this color combination would be just awful. I went with Maria to the fabric store where we found a piece of fabric with sunflowers all over it. It had the right shades of both the yellow and the green. We used this fabric as a starting point to pick the other fabrics. Maria knew she wanted a star quilt for a queen sized bed, which meant we had to find eleven coordinating fabrics for the star as well as a background fabric. There were not enough shades of yellow or green to step from light to dark without adding in a third color. Since both Maria and Adam were thinking of a nature inspired quilt, they settled on adding blue to represent the sky.

The next step in making this quilt was to cut the fabric into strips. In these two pictures, you can start to get a general sence of how the colors will work together.

The strips are sewed together in six sets of six strips. Then the strips are cut a second time, diagonally in order to give it the diamond shape.

The strips are then sewn into a large diamond like the one above. It takes eight of these large diamonds to make the star pattern.

The large diamonds are are then sewn together. In this picture, the diamond blocks are laying on the background fabric because my rug is nearly the same color as the quilt.

Once all eight large diamonds together, the background fabric is cut and added to the star.

After the background comes the borders. You can see that this large quilt is starting to eat my living room.

One of the most challenging aspects of making a star quilt is lining up the points in the diamonds. It's hard to see with this resolution, but I was quite proud of my "perfect points."

To finish this quilt, I planned on tying it rather than machine quilting, so the next step was to pin the edges to the back and batting and sew around the perimeter. The quilt is then turned right-side-out and the hole that is used to turn is stitched shut. The blocks are tied through all three layers and the borders are sewn "in the ditch" to add stability.

This is the finished quilt on my too small full sized bed.

And this is the final stop for the quilt: Maria's and Adam's bed.

(Lone Star approximately 108"x115" (generous queen) 2007)

Bears for baby girl

This quilt was made-to-order for a fellow teacher. She wanted a special baby quilt for her niece and asked me to make it. The room's theme was Boyd's Bears, so she was hoping I could find some kind of teddy bears to have in the quilt. I was able to find the licensed fabric, and used the gingham background as inspiration for the pinwheel blocks.
The design of the Boyd's Bears fabric was very busy and rather large. I chose to use 5"x5" blocks of this fabric on every other block to highlight this fabric and a pinwheel in pink for the quilted blocks. I normally would not put so much blue in a quilt meant for a girl, but this fabric was especially hard to match. The blue is more correct in the first picture than in this second picture and is in the periwinkle range rather than baby blue, which gives it a more feminine quality.

(Pinwheel with Sashing approximately 48"x60" 2007)

For baby boy

This was the quilt I made for Maria's baby. She knew they were having a boy, and wanted to decorate the room in hot air balloons. I really was lucky to find such nice fabric, so I wanted to show it off. I think that this stripy design makes it look like you're looking out a window at all the hot air balloons taking flight.
I kept the quilting pretty simple. I wanted the balloons to be puffy, so I free handed stippled clouds into the blue background.
To finish the set, I also appliquéd a couple of balloons onto this special nursing pillow. I tried two new things on this quilt. I never mitered corners before, and I thought it would look nice with all the stripes. I also used a batting that is 50% bamboo and 50% cotton. It was really lovely to work with, and I am thrilled that it is more environmentally friendly and has the natural antibacterial properties (especially for a baby quilt).

(Stripy approximately 50"x60" 2008)