Last year I attended a kilt making workshop. When I went to find material, the local plaids bared no resemblance to any of the clan tartans that I wanted. Then I stumbled on this flannel and went for it.
The friend I was making this for has a sister who struggled with breast cancer. He also is one of my fiercest advocates and is always checking that I am healthy after my breast cancer as well.
I added a pink ribbon in case the hot pink kilt was misunderstood.
The pleats in the back. I love how it turned out. I don't have any pictures of him in the full garb, but if I get one, I'll add it in.
Friday, April 15, 2016
Thursday, April 14, 2016
J - Juvenile Diabetes
There is a very special girl in my life who is 11 and dealing with Juvenile Diabetes. This last year, I made her a special purse to hold her supplies. It had to be both cute and functional, so a lot of planning went into the project.
We began by making a list of her supplies and she rated how often she used them. Then we measured each thing and decided where it should go in a purse (outside pocket vs. inside pocket).
She had this wonderful owl fabric that her mom got, but I had her add to it by going through my crazy quilting scraps. I am proud to say that she picked all the fabrics, and she really has an eye for color!
I found some owl buttons, and even though I used Velcro to close it, they were just too cute and had to get used.
Her favorite part is that there are actually little sewn pockets that are made to hold suckers.
It is still a pretty big purse for an 11-year-old, but she loves it, and it should have room to grow with her.
We began by making a list of her supplies and she rated how often she used them. Then we measured each thing and decided where it should go in a purse (outside pocket vs. inside pocket).
She had this wonderful owl fabric that her mom got, but I had her add to it by going through my crazy quilting scraps. I am proud to say that she picked all the fabrics, and she really has an eye for color!
I found some owl buttons, and even though I used Velcro to close it, they were just too cute and had to get used.
Her favorite part is that there are actually little sewn pockets that are made to hold suckers.
It is still a pretty big purse for an 11-year-old, but she loves it, and it should have room to grow with her.
Wednesday, April 13, 2016
I - Ink
Ink printing is a new area that I have been trying. If you read about the ermine or saw the picture of the bunny dress, that was my latest project. I made two other stamps in the last year, the sunflower/sun and the clarinet tree of life.
I found the white stamps at Michael's, and I plan on trying out embellishments on tunics to see how well they work. It is definitely a different way of decorating fabric, but I am really enjoying it.
H- Heraldry
Heraldry, also known as Coat of Arms or Device is the historic way of telling people apart. Think of it like football teams in the Renaissance Era. They had to be distinctive enough from each other so that a person could tell if they were a friend or foe at fifty feet. When it comes to crafting, I use heraldry all the time in my designs. Here are some examples:
These are the ones I have done with my heraldry in Amtgard:
Labels:
A-Z Challenge,
Amtgard,
Clothing,
Melody Songtailor's Studio,
SCA
Monday, April 11, 2016
G- Gee, I need a break
Okay, yes, this is not related to crafts. So, last time I tried the A-Z challenge I was diagnosed with breast cancer some time around M and gave up. This time, I went to the hospital with cellulitius, which I have had 6-7 times since they removed 25 lymphnodes. I am tired of being chronically ill. I want to finish the challenge, but, gee, I just can't think of crafting today.
Wednesday, April 6, 2016
F- Filigree
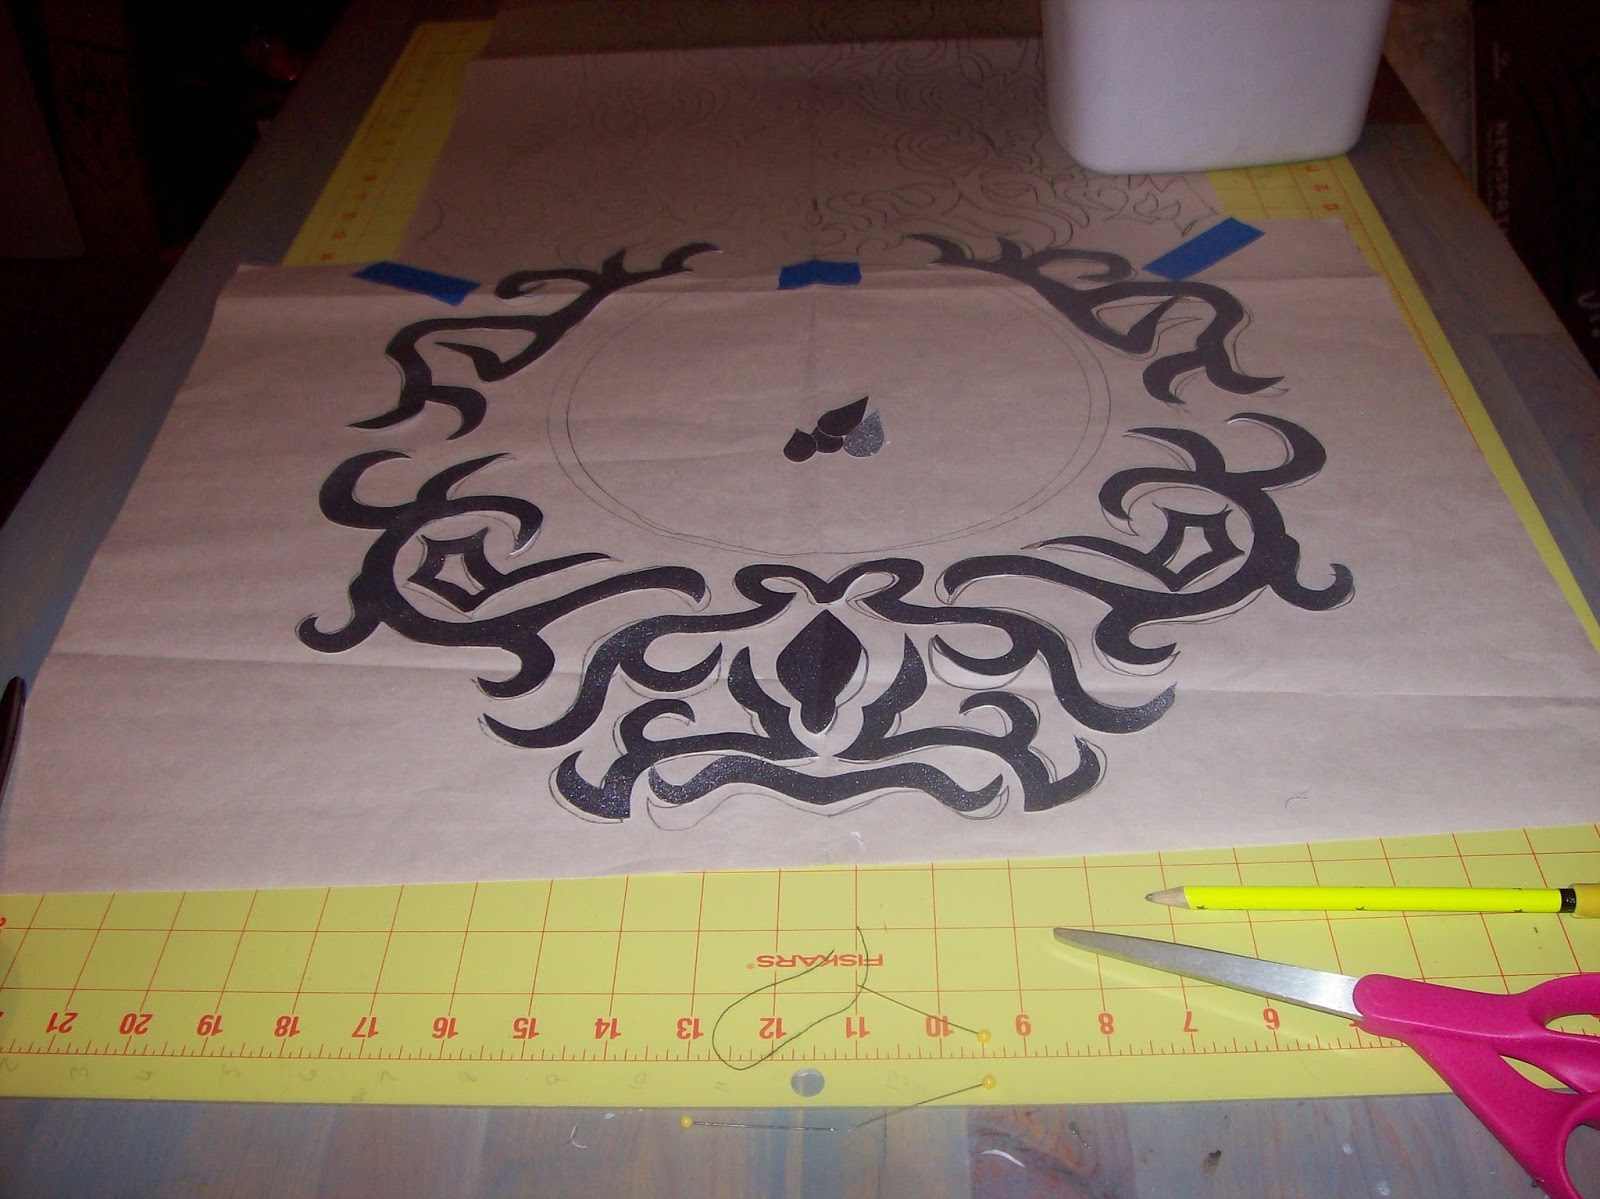
So, there are a lot of F-based sewing words like fabric, fiber, fleece, flannel, etc. so I thought I would do a word that is less well-known. This is a circle cloak that I made a few months ago with tons of filigree appliqued on.
I began by sketching the filigree on some newsprint paper, then I mirrored the design.
I traced it on to heat-n-bond and ironed it to some crepe backed satin (a.k.a. hammered satin). I love how crepe backed satin in gray or gold looks like real metal.
I carefully cut out each piece and ironed them down to the black linen.
I used gray thread to satin stitch around each piece.
The finished cloak. You may notice that the edges are torn, and that was done very much on purpose.
I began by sketching the filigree on some newsprint paper, then I mirrored the design.
I traced it on to heat-n-bond and ironed it to some crepe backed satin (a.k.a. hammered satin). I love how crepe backed satin in gray or gold looks like real metal.
I carefully cut out each piece and ironed them down to the black linen.
I used gray thread to satin stitch around each piece.
The finished cloak. You may notice that the edges are torn, and that was done very much on purpose.
Labels:
A-Z Challenge,
Amtgard,
Clothing,
Melody Songtailor's Studio
Tuesday, April 5, 2016
E - Ermine
I was given a commission to make a heraldic dress for the above Coat of Arms. The overall design is not very challenging, with one exception. The background design is called "ermine" and is meant to duplicate the fur of a spotted ermine. But, as people used this heraldry, it became more designer, so it developed into something that is a cross between a pretty little art symbol and a little ermine footprint.
Doing a single ermine would not be all that challenging, but as you can see on the original Coat of Arms, having a repeated ermine greatly increases the complexity of the project.
Since this is for a person in the SCA (Society for Creative Anachronism), historical accuracy is something that is prized. I chose to use a wood block printing technique to add the ermine to the fabric. I began by carving a woodblock.
I experimented with several types of ink before discovering that there was one specifically made for what I was doing. It takes a long time to dry (a full week to cure and 4-6 hours before I dare try and move it), but it is working nicely.
I chose to sew large sections of the dress first so that the ermine would fall exactly in the right spots and would not be cut off in weird ways.
The dress is still in the works, but here is a sneak peek of how it will look. I mixed machine applique with hand embroidery to get a mostly authentic look. I'll post again when this is finished and add a link here.
Labels:
A-Z Challenge,
Clothing,
Melody Songtailor's Studio,
Other Crafts,
SCA
Monday, April 4, 2016
D - Designing
I find that I spend a great deal of time designing the garb I sew. A lot of people will come to me and say, "I want something cool with this color and this thing." My drawing skills are not the greatest, but it is the easiest way of explaining what I am thinking.
So, here are a couple before and afters and a few still on my to do list. I really love coming up with ideas and working with my clients to make something that is totally unique and totally what they love.
Sunday, April 3, 2016
C - Circle Cape
This is my friend Evan, molding a circle cape I made. I really like circle capes because you can throw them over anything, and it makes it look like you have both a tunic and cape on. It can change field garb into court garb in the time it takes to pull it on over your head.
Rather than doing grommets, I experimented with these decorative metal findings that I got in the beading section. They work well and have a cool look.
This was the first project that I got to try out my new serger on. It made finishing the edge a breeze rather than a nightmare. I like how it can give a really nice thick decorative edge on a fabric that would otherwise fray, and without the hassle of trying to roll the hem of a perfect circle.
Labels:
A-Z Challenge,
Amtgard,
Clothing,
Melody Songtailor's Studio
Saturday, April 2, 2016
B - Ball
I am really loving making Temari balls. They are constructed by starting with a little packet of rice or a jingle bell. Then you wrap it in yarn and wrap it in sewing thread. Once the ball is done, you then embroider it with a design. They were originally intended as a child's toy, and they are surprisingly durable and bouncy.
This is just a sample of the new ones I made in the last 6 months or so. I made 15 mini ones for little Christmas gifts.
More often than not, I have been making balls for the game of Amtgard. They are used to represent spells when we play on the field. A person has to say an incantation and then throw the ball and hit another person in order for the "spell" to work. It is half a game and half a bit of acting, but fully fun.
The spell balls have strict color rules, so I try to keep them fairly obviously only one color.
These were "normal" temari balls. The one on the left was a give away for reaching 100 likes on my facebook page, and the one on the left sold on Etsy.
This is just a sample of the new ones I made in the last 6 months or so. I made 15 mini ones for little Christmas gifts.
More often than not, I have been making balls for the game of Amtgard. They are used to represent spells when we play on the field. A person has to say an incantation and then throw the ball and hit another person in order for the "spell" to work. It is half a game and half a bit of acting, but fully fun.
The spell balls have strict color rules, so I try to keep them fairly obviously only one color.
These were "normal" temari balls. The one on the left was a give away for reaching 100 likes on my facebook page, and the one on the left sold on Etsy.
Friday, April 1, 2016
A - Applique Instructions
A-Z Challenge... 1st up, instructions on how to do machine satin stitch applique. This will mostly be photos with a little info on each step.
Begin by picking a pattern and drawing or printing it out. Make sure it fits in the location you desire. This tutorial was done using 100% cotton broadcloth under the name brand of Country Classics Solids sold at JoAnn's, but this technique will work for many types of fabrics.
There are several bonding methods you can use. If it involves using an iron on glue, then this tutorial should still work. I used heat-n-bond lite. It is designed to be sewn, unlike heat-n-bond heavy duty which will gum up the needle if you sew with it. I also used carbon paper to trace the letters.
Carbon paper has a sticky side that leaves the black line and a gray side that is smooth and clean. You don't need to print in reverse if you stack your paper correctly.
Place the carbon paper with the graphite/carbon side up. Place the heat-n-bond with the paper side down (the glue side up), then place your letters on top. Use a pencil or embossing tool to trace around each letter. I was saving space on my heat-n-bond, so I drew the R by itself later.
Set your iron to MEDIUM, between the cotton and polyester. Do not use high heat. With your iron set to MEDIUM, iron your PREWASHED fabric. If you do not prewash the fabric, you will not get as good a bond between the fabric and the heat-n-bond. Prewashing also helps prevent fabric from bleeding and helps prevent it from shrinking at different rates. If you plan on washing the piece at all, I recommend you begin by prewashing the fabric.
Place the heat-n-bond on the fabric and lightly press it. You want the paper to stick, but you do not want the glue to start going through the fabric, so do not leave the iron on the paper for very long.
Once it is cool, cut around the edges. It is both cleaner and easier to rough cut before you iron and precisely cut after. Then you aren't cutting twice, and the glue goes all the way to the edge of the applique.
Measure and mark where the letters will go using a water soluble marking pencil.
Peal off the paper and use your iron set on MEDIUM to glue each letter down. You can peal and reposition at this time, but it may leave behind glue, so it is better to go slow and do it right the first time.
Set your machine to a zig-zag stitch (mine is #3)
Adjust your tension down. This will give a smoother look to the edges and will prevent your bobbin thread from peeking through.
At this point, adding stabilizer to the back can help make a smoother edge. I tend to skip it because I have a nice enough sewing machine and was using quality enough fabric that it did not need it.
Check where your needle will hit before you start. I always aim to have the needle hit right on the edge where the two fabrics meet, but fully on the background side. That way, there is as much applique fabric as possible under the stitches, so it is less likely to tear out in the wash.
Tight curves are challenging. Go slowly on the machine while turning quickly with your hands. Try to keep the fabric always perpendicular to the zig-zag the needle is doing.
On tight corners, bury the needle to turn so you don't get extra loops of thread. You may have to adjust when you put the foot back down to keep the line of the satin stitch looking the best.
Leave long threads every time you need to start and stop. It helps make the next step easier.
Thread the loose ends through a needle and pull them to the back of the applique.
Tie a double knot with the thread that was already in back.
Trim the threads. I will leave threads that are less than 1/2" if they are tight on the fabric, but otherwise, I trim them.
With smaller letters, I set up the width to be narrower. This is an example with a width of 1.5 and a stitch length of 0.4.
The front of the finished tunic. He wanted it to look like a cross between a Ravenclaw Quidditch jersey and a typical Amtgard (LARP - Live Action Role Playing) tunic.
Begin by picking a pattern and drawing or printing it out. Make sure it fits in the location you desire. This tutorial was done using 100% cotton broadcloth under the name brand of Country Classics Solids sold at JoAnn's, but this technique will work for many types of fabrics.
There are several bonding methods you can use. If it involves using an iron on glue, then this tutorial should still work. I used heat-n-bond lite. It is designed to be sewn, unlike heat-n-bond heavy duty which will gum up the needle if you sew with it. I also used carbon paper to trace the letters.
Carbon paper has a sticky side that leaves the black line and a gray side that is smooth and clean. You don't need to print in reverse if you stack your paper correctly.
Place the carbon paper with the graphite/carbon side up. Place the heat-n-bond with the paper side down (the glue side up), then place your letters on top. Use a pencil or embossing tool to trace around each letter. I was saving space on my heat-n-bond, so I drew the R by itself later.
Set your iron to MEDIUM, between the cotton and polyester. Do not use high heat. With your iron set to MEDIUM, iron your PREWASHED fabric. If you do not prewash the fabric, you will not get as good a bond between the fabric and the heat-n-bond. Prewashing also helps prevent fabric from bleeding and helps prevent it from shrinking at different rates. If you plan on washing the piece at all, I recommend you begin by prewashing the fabric.
Place the heat-n-bond on the fabric and lightly press it. You want the paper to stick, but you do not want the glue to start going through the fabric, so do not leave the iron on the paper for very long.
Once it is cool, cut around the edges. It is both cleaner and easier to rough cut before you iron and precisely cut after. Then you aren't cutting twice, and the glue goes all the way to the edge of the applique.
Measure and mark where the letters will go using a water soluble marking pencil.
Peal off the paper and use your iron set on MEDIUM to glue each letter down. You can peal and reposition at this time, but it may leave behind glue, so it is better to go slow and do it right the first time.
Set your machine to a zig-zag stitch (mine is #3)
Adjust
your stitch width and length. I tend to set the stitch width from 1.5
for super detailed or tight applique to 6 for extra wide satin
stitching. Each machine is different, so test to see what works best for
you. Set the stitch length to very narrow. On my machine, 0.4 is what I
have found to be the best at being both thick enough but not so thick
that it jams.
Adjust your tension down. This will give a smoother look to the edges and will prevent your bobbin thread from peeking through.
At this point, adding stabilizer to the back can help make a smoother edge. I tend to skip it because I have a nice enough sewing machine and was using quality enough fabric that it did not need it.
Check where your needle will hit before you start. I always aim to have the needle hit right on the edge where the two fabrics meet, but fully on the background side. That way, there is as much applique fabric as possible under the stitches, so it is less likely to tear out in the wash.
Tight curves are challenging. Go slowly on the machine while turning quickly with your hands. Try to keep the fabric always perpendicular to the zig-zag the needle is doing.
On tight corners, bury the needle to turn so you don't get extra loops of thread. You may have to adjust when you put the foot back down to keep the line of the satin stitch looking the best.
Leave long threads every time you need to start and stop. It helps make the next step easier.
Thread the loose ends through a needle and pull them to the back of the applique.
Tie a double knot with the thread that was already in back.
Trim the threads. I will leave threads that are less than 1/2" if they are tight on the fabric, but otherwise, I trim them.
With smaller letters, I set up the width to be narrower. This is an example with a width of 1.5 and a stitch length of 0.4.
The front of the finished tunic. He wanted it to look like a cross between a Ravenclaw Quidditch jersey and a typical Amtgard (LARP - Live Action Role Playing) tunic.
Back of the tunic.
Labels:
A-Z Challenge,
Amtgard,
Clothing,
Melody Songtailor's Studio
Subscribe to:
Posts (Atom)