Saturday, March 26, 2016

Joust Player 2


This tunic is like two projects in one. Since I have talked about making tunics before, I will focus on the Joust badge. The person who commissioned this wanted player two in pixels on the tunic. Typically I applique on the details, but for this project, piecing made more sense.


I began by blowing up the player two in flight and finding colors of cottons that best matched the colors of each pixel. 


I used my rotary cutter and mat to cut 3/4" by 3/4" pieces of each color.


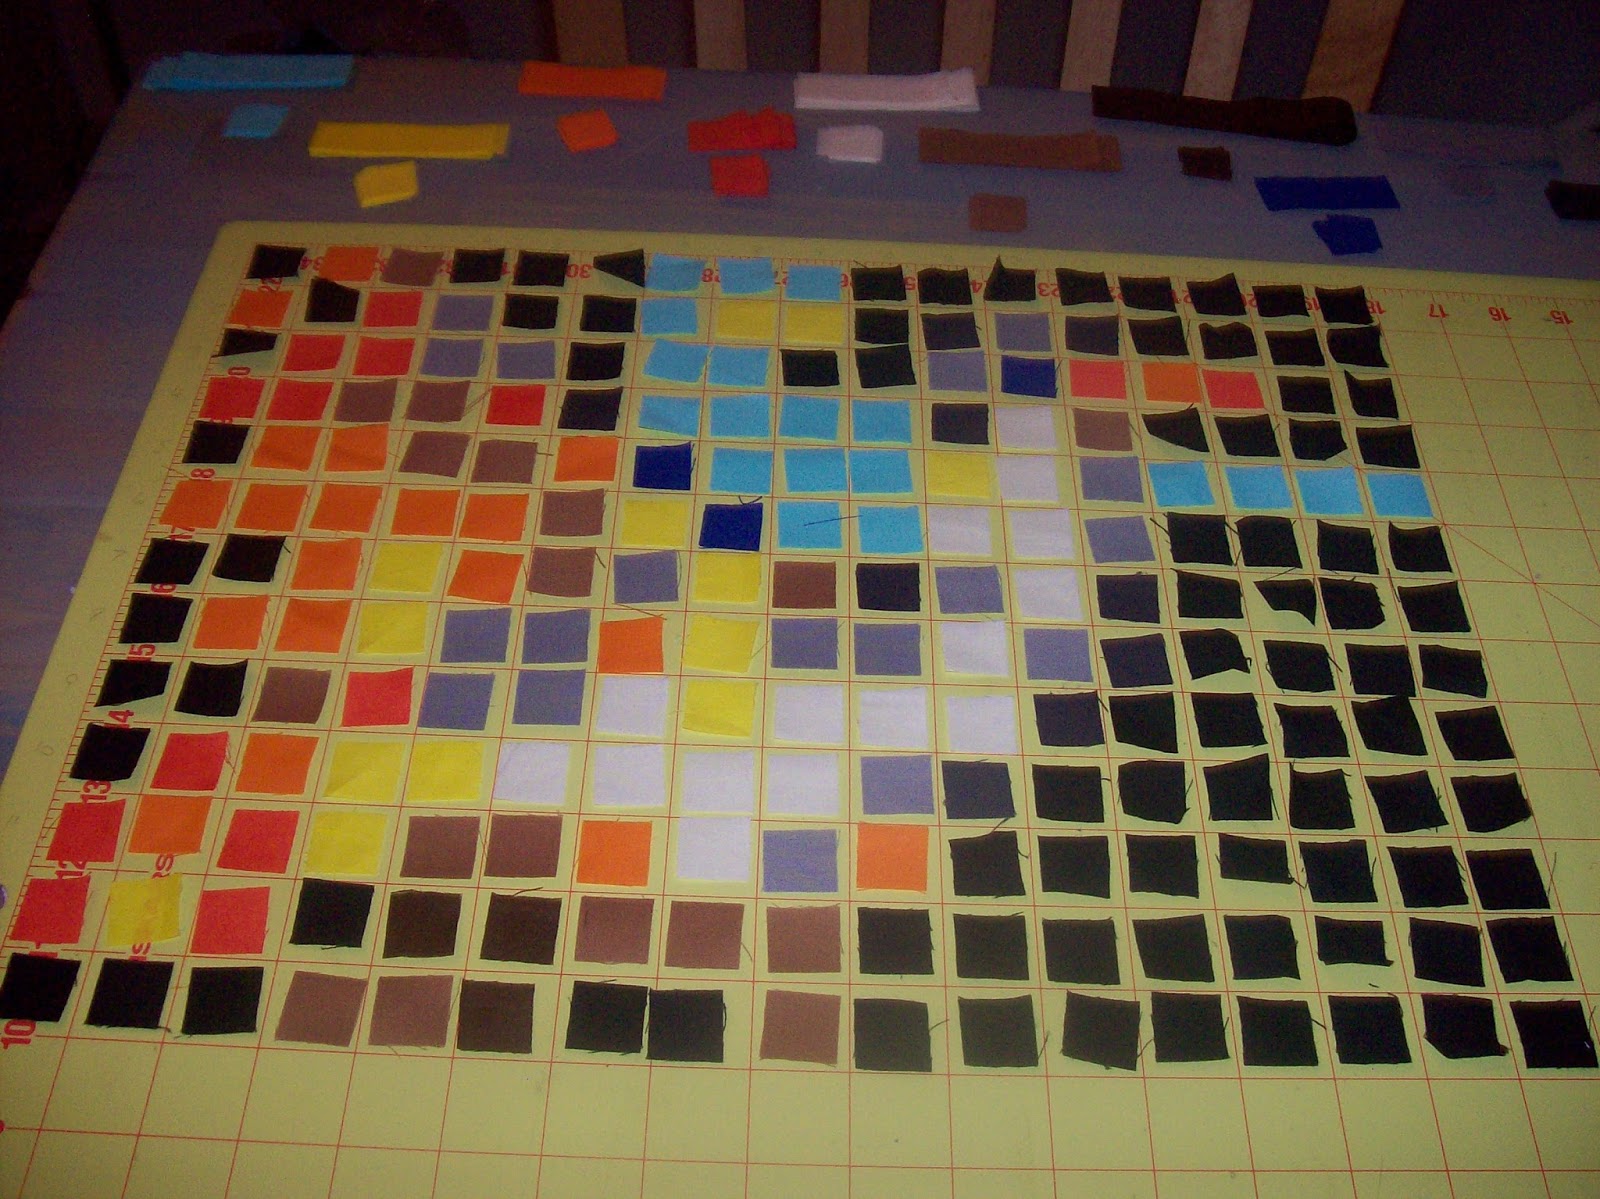
Once they were laid out, I  chain stitched them together going vertically first and using a 1/4" seam allowance. Chain stitching is basically like assembling blocks normally, but you go in order and don't cut the blocks thread between each block so that it holds the block or quilt in approximately the correct place for the next stitching.


 This is what it looks like after three rows of chain stitching.


This is what it looks like when all the vertical lines are finished.  You can see the gaps between the blocks, but it is all held together to make the next part easier.


Then I pinned  and sewed each row horizontally.


This is what the back looked like. I added in a little extra around each edge. It was quite difficult to choose a thread color for this mini quilt. I settled on light gray because it was in the middle of most of the colors. It unfortunately showed a lot on the black, but I am not sure that I could have done it any other way with better results.


It was certainly an interesting project. I may try pixel art again in the future.

Monday, March 21, 2016

A Note on Links

So, it looks like when I changed the name of my blog, I broke all the links to my blog. It will take a while to find and update them all. Sorry about that!

Gray Lantern Loaner Garb

Gray Lantern is an amtgard group located in Cheyenne, WY. When they did not win the prize package for loaner garb that Crimson Dawn won, I offered to do a package for them if they payed for the materials.
This was the original heraldry. I asked if they minded if I modified it a bit because some of the elements would not translate to sewing very well. I also wanted to give the lantern a more medieval look.


One tabard and one shirt were simply the park's colors.  Otherwise, I took heraldry elements and added some interest to the design.


I tried something interesting with the neck on this one. Rather than making the interfacing show as a pop of color, I chose to put it inside as you would on a modern garment,  and then I used a decorative stitch to still give it the look of a medieval tunic.


This was a fun project. It was a bit of a long time making because I kept having to put it behind other paying clients, but it went out around Christmas.


Sunday, March 20, 2016

Flur-de-lis Tunic


Sorry for the poor pictures on this one. My camera was dying, so I tried using my cell phone.

I really like the design of this tunic. The quilting fabric fits well with the solid green. I like that the green wasn't the every-day Christmas green that is commonly used in tunics.


I am really fond of using this neckline now. It took a while to develop my own "look", but I think this does it. Most people want circular necks, which just don't look very historic. The little V seems to give it a bit more of a Renaissance look. I have also extended the V down lower to open it up further, and I am fond of that look as well.


Saturday, March 19, 2016

A-Z April


Well, I am going to try this out again. The last time I tried in 2013, I didn't finish because I was diagnosed with breast cancer. I am in remission and finally feeling up for the challenge.

Ribboned Fairy Skirt or Dress


In December I went wedding dress shopping with my cousin. There was a really cool skirt on one of the dresses (I didn't care for the top), and I looked at it closer to see if I could duplicate it. I really loved how the fabric did curly-cues down the sides of the skirt. Rather than making bridal wear, I thought it would be fun for a fairy skirt.


I found this fabric, which basically is netting with ribbons and sequins sewn to it, in the clearance section. At first, I thought it would be nice for curtains, but then I thought about the wedding dress and figured it was worth a shot. The biggest trick to getting the curly-cues is using horsehair braid on the edges. 


Since I plan on selling this in my shop, I wanted it to fit many sizes. I used super soft teal elastic for the band and used about 300 pins to space it evenly. Because of the extra effort, it fits a person who is size M to 2XL without issue. It also works well as either a dress or a skirt.


I added three layers of netting to help puff out the skirt. I recently got a serger, so this was one of the first times I was able to use it, and I likely would not have tried it without the serger. 


 I will likely make more fairy skirts in the future because I think they look different and fun. I have some pink iridescent fabric on my shelf waiting to be used. If you are interested in this skirt, it is for sale on my Etsy Store, or I can make you one in whatever color you like.


Friday, March 18, 2016

Mask Fundraiser

Peacock Feather

 This is the second time I have done a masquerade mask fundraiser. They will all be up for silent auction on Saturday at my local Amtgard park. Most are based on fighting companies' and households' heraldry. I put my favorite first. I made most of them using the cardboard mask blanks from Michael's and painting them with acrylic paint. I also used puff paint and tulle to make the rest. My cousin Randi pitched in and made one as well because she thought it looked like fun. Enjoy!

 Blue Butterfly

 Dragonblade Mercenaries

 Cosmos

 Slytherin

 Dragonflies

 Star Wars Storm Trooper

 Hufflepuff

Monarch Butterfly

Queen of Hearts

 Wolves of Valor

 House Ansgar

Fallen Phoenix

 Ravenclaw

 Gryffindor

 The Lost Boys

 Deadpool

 Sun's Haven

 Mock Lace 

  Mock Lace 

  Mock Lace Dragon

  Mock Lace 

 Mock Lace