Tuesday, June 30, 2015

Bedsheet Tunic


This was a commission from someone without the time to finish the project. He bought the king flat sheet and wanted to make a tunic.  This was an interesting challenge because there was exactly 99 usable inches of trim.


The neck was the biggest challenge because there were so many layers to sew through and so little room for error. Fortunately he wanted the sleeves tapered, or I would not have had the trim to make the keyhole neck.


It would have looked a bit plain without an additional pop of color, and the hem would not have had trim at all . I fortunately found this fabric that was a very close match to the background tan. It was rather sheer, so I simply sewed it on top of the other fabric rather than quilting the fabrics together.


I used steam a seam to help hold everything in place, and I was really pleased with the results. Pins normally shift around a bit with sheer fabric, so the steam a seam helped quite a bit. I will definitely use it again in the future.

Sunday, June 28, 2015

Dragon Master at Sun's Haven

Yesterday I entered the dragonmaster competition. I don't know the results yet, but here's what I entered:


Thursday, June 25, 2015

Longstitch Autumn Quilt (Needlepoint)


Today I mostly prepped for the Dragonmaster competition this weekend. I will be entering 18 items I have made, so I am hoping to do well. This is a longstitch I made a few years ago but never framed. The frame is cheap, and I will likely get a better one in the future, but it is good enough for now since it is the needlework they will judge, not the frame.

I found the pattern and all the supplies for this design in my favorite needlework store, Nordic Needle in Fargo, ND. I used two different variegated threads to complete the pattern. It took a lot of planning to get the colors to align correctly so the variegated thread would do the colors in the correct places. Once the long point was finished, I went back and added in to backstitching in the copper. I avoided framing this under glass because it sometimes distorts the stitches due to the pressure of the glass.

I love Nordic Needle, and I wish I lived closer. They have so many cool things to stitch. I don't normally advertise other places, but they deserve a plug because they are amazing. I remember their being around and amazing when I was a little girl too. That's really where I started my love of sewing. So, a special shop deserves a special comment from me.

Tuesday, June 23, 2015

Nightshade Plushie Part 2

I finished this little guy today. He was quite fun to make and I think he turned out really nice!


When I went to take his pictures, I thought it would be fun to stick him in my scooter basket.


His tail feathers and wings took extra time because they needed to be ragged. It is hard to make fabric look distressed while actually makeing it so the fabric won't rip and tear in the future.


His eyes are supposed to glow, and I think these buttons do a great job of looking like they glow in just about any light.


I used poly beads to make him sit nicely, so he is a bit weighty.


The light hit just right to really make his eyes glow in this shot. I hope I get more orders for plushies... they are pretty fun to make!


I forgot the hand diamonds, so here is a shot of one and an up close of the super cute ear.

Monday, June 22, 2015

Nightshade Plushie

Another special order, this time from FA. Nighshade is a Dutch Angel Dragon, and he asked me to make a plush toy for a prop when he was not in his suit.

Here are the pieces roughly cut out.


I had to look often at the reference to get the details right, but make them soft and loveable in the plush toy style.


Nightshade is a grumpy and disheveled  Angle Dragon, so he wanted his battered feathers to show


For those who haven't seen Nightshade, here is a very cool drawing done by Angel's Nest.


Saturday, June 20, 2015

Wand Workshop

I did a wand making workshop at the park today. The students were excited, and their wands turned out great! I need to bake them yet, but I wanted to get the post up before I go to bed.


Thursday, June 18, 2015

Hardanger Hankie Part 2

The project I was working on today is a secret, so here is an update on the hankie. I need to finish the weave in the upper left and then add in some seed pearls in the center. Then it'll be time to make the matching one.


Wednesday, June 17, 2015

Clay Wand


I am teaching a class on clay wand making this weekend, so I needed to make a demo. I used to teach my students how to make clay batons when I taught band and orchestra, so I knew the technique would work, even though I hadn't actually ever made a wand.

My pictures didn't turn out very nice, and I have dry brushed a little, so I may add another photo of the finished product later.

Tuesday, June 16, 2015

Special Order Part 2


I finished the mini temari today, along with two other projects.


In a lot of ways, the mini turned out better than the original. The poles are even, and the equator is also more even.


 Making the tassel was a bit more challenging.


It has an extra loop at the top to attach it to a key chain. The person who ordered it asked only for a loop because they have a special chain they want to attach it with that has a swivel.

As always, I love special orders, so feel free to contact me if you would like something out of the ordinary!

Monday, June 15, 2015

Little Cabin in the Woods

It is difficult to keep a secret from a loyal reader. For this quilt, my brother and I conspired against my dad to make a Father's Day quilt. He is rather difficult to shop for and often says he only wants a card. I suggested this idea, and my brother loved it. He would buy the materials, and I would put in the work, so the quilt would be from both of us.


Dad has a cabin in the woods of the Wet Mountains near Westcliffe (really a nice house, but we call it a cabin). I've been wanting to make a log cabin quilt for his cabin for years. Dad's favorite colors for decorating are forest green and tan or brown. The brown section of the fabric store was a bit to dark and none of the fabrics would do the nice stepping from color to color, so I went a little more on the cream side. It will still match the furniture he stained. The blue is mostly my addition because there are so many beautiful blue sky out there.


Log cabin blocks are crazily versatile when it comes to layouts. It's especially true if you do a 36 block square king. I took a bunch of pictures to prove this point, but really, these options are only the tip of the iceberg. These first two are zigzag, and the one I thought I would most like.


Notice how just setting the zigzag off by one block can change the look of the quilt. The lighting in these pictures is not the greatest, which I think makes it a bit harder to see how the patterns work or don't work well with the fabric. My middle dark is a bit more olive than it looks in real life. If I were to go with a zigzag,  I would pick the first one, because both seem to make the cream stand out more than the green, and I like how it is balanced in the first picture more than the second.


With the diamonds, again I laid it out to show both the green and the cream focused.


And again, I think it looks a bit better with the cream than with the green.


This block pattern is called pinwheel. I did this for one other quilt and I liked the look of it for that one. For my dad and for this set of fabrics, I felt it was a bit too turbulent.


Fields and Farrows is a common block lay out. I've done it several times, but mostly on small quilts.


This is my typical go-to on a square quilt - Barn Raising. It doesn't work well on a rectangular quilt and doesn't work at all on an odd-numbered block quilt.


To me, doing the same direction on all blocks is a boring kind of pattern. One of the reasons I love log cabin quilts is that by rotating the block, you get the secondary pattern. To me, this just looks like a "normal" block and an average quilt.


Arrow is another interesting option. This works well as long as you have an even number of blocks width wise.

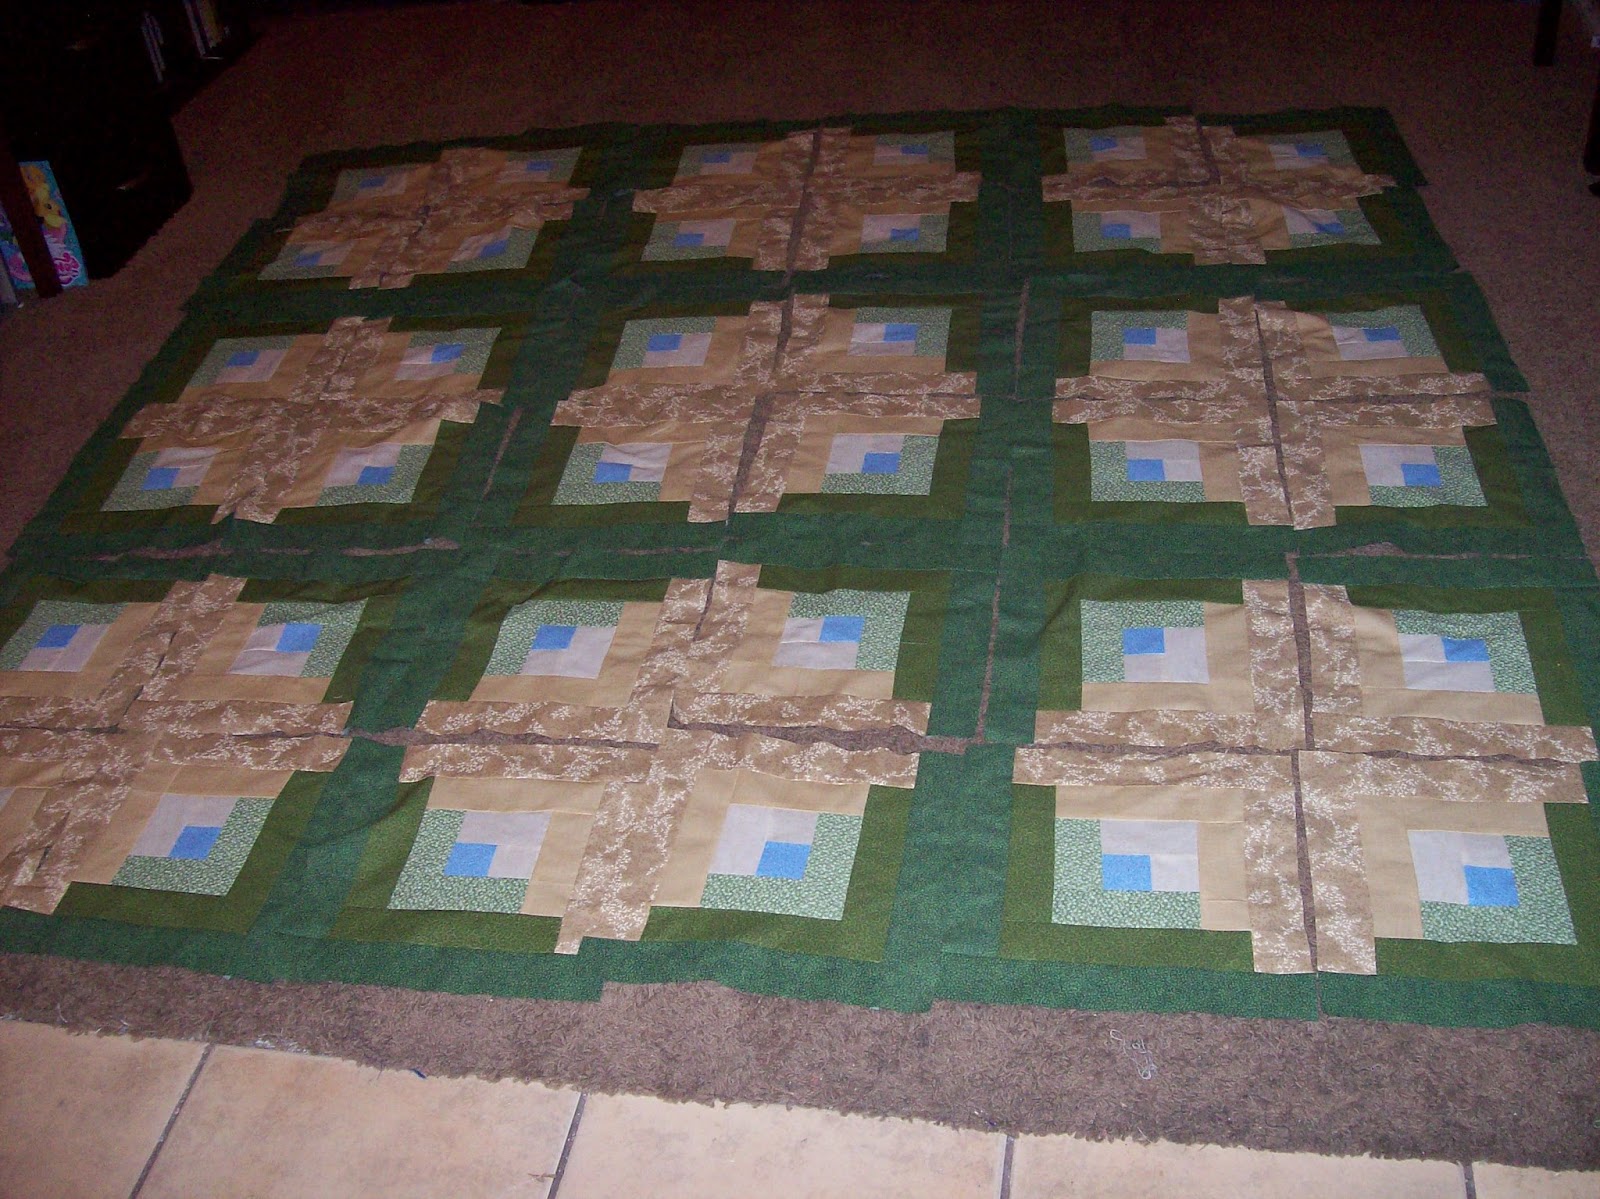
 So... my final choice? None of the above. I liked the diamonds the best, but it was not turbulent enough... it looked too plain, so I decided to make the center diamond the opposite color. I considered making it like a nine patch of diamonds, but it was a little too turbulent. I think this has just the right amount of action to keep the eye moving, but enough peace to let it rest.


The colors in these photos are much closer to real life. There is still a bit of olive, but it doesn't quite jump out as much as the flash showed.


 Since I moved, I don't have a plushy grass to take my photos in or a nice clothesline to tie up, so I had to settle for the gravel and a lint roller.


I also had some trouble in the final steps. My floor was smaller than the quilt. If I make a lot of king sized quilts, I may have to move some furniture. This quilt was approximately 110 x 110.