Saturday, May 30, 2015

Cheshire Cat Tunic

The upcoming reign in Iron Mountains will likely be Alice in Wonderland themed (the person is running unopposed and the vote is not yet done), so I made this tunic to celebrate the theme.


 I tried a new technique on the mouth, and it worked okay... I still need to work on it.


The organza ribbon on the sleeves and the bottom was more difficult than I anticipated. It didn't want to stay in the right spot. Pins didn't seem  to help, which I find odd.


 I placed the tail so it would hit the belt line.


 Anyway, fun times with a tunic! I will try and sell this at the comic con, but so far I haven't had much luck with the con.


Friday, May 29, 2015

Shield Cover


This was another crafting game project  This is my write up:


Bias tape is super cool because it can do things that fabric not cut on the bias can't. I took advantage of this fact when planning my design. It has an amazing ability to do curves while remaining flat, and with a little pleat, it can also do a nice sharp angle. I chose to do a shield cover because I currently had a lame shield cover, and because it was a nice round object that would show off the cool bias tape techniques. I used three different kinds of bias tape in this project. I had a specialty quilting bias tape (the black one) left over from a project, some regular white 1/4" doublefold bias tape left over from another project, and I cut my own bias tape from a dark blue cotton fabric from my stash.


I started by tracing my design onto the blue background fabric (left over from a dress I made). I pinned the black bias tape down, but it looked too mono-chromatic, so I pulled up all the pins and added a brown and a green fabric underneath (both from my stash).


 I used heat-n-bond (from my stash) to secure the fabric and then re-pinned the black bias tape in place. I ironed down the bias tape in sections, smoothing out all the wrinkles and adding in pleats for the sharp corners and sewed a scant 1/8" seam on both sides of the tape.


Then I measured the cover against the bevel in my shield and through math and fabric pencils marked where I would add the blue border. 


I cut the blue fabric on the bias in 7/8" strips and backed them with heat-n-bond.


 I cut off part of the white double folded bias tape to turn it back into singlefold bias tape and used Steam-a-Seam to turn it into quilting bias tape. Then I pinned the white and black bias tape over the blue bias tape and ironed everything down. I sewed a scant 1/8" seam on the black and white bias tape, going through the blue bias tape as well. 


I finished the cover by sewing two strips of blue fabric to the cover and using a drawstring and toggle stoppers to pull it tight. The shield cover will well outlast the shield now, so I made it compatible with any max small round shield, up to 4" thick. 


The technique I used is commonly referred to as "stained glass appliqué" because the project resembles stained glass when finished. I tried to use a minimum of colors so that the Celtic knotwork of the bias tape would take center stage rather than the fabrics that simply help bring out the details of the design.  


Faery Wings

I didn't finish my project today, so here is one I finished last month. I am in a contest based on the Hunger Games for crafters. For this round, we had to create something for a faery court.


I have been wanting to make a pair of fairy wings for a while now, but never had a real reason to get it done. Originally I had been thinking of playing around with heat-shrink window film and wire, but I am glad that all my happy accidents lead me in a different direction. It began when I went to the shed to look for wire. I had none, but on my way back into the house I saw the bucket full of mesquite branches I had recently harvested from my dad's windfall tree. I planned on making baskets with the branches, but they weren't pliable enough to do baskets. However, they were just right for wings.


I had florist tape on hand, so I began wrapping the wings in white florist tape. Then I experimented with the plastic and some translucent stained glass paint. The paint looked okay, but it just looked too fake to have 
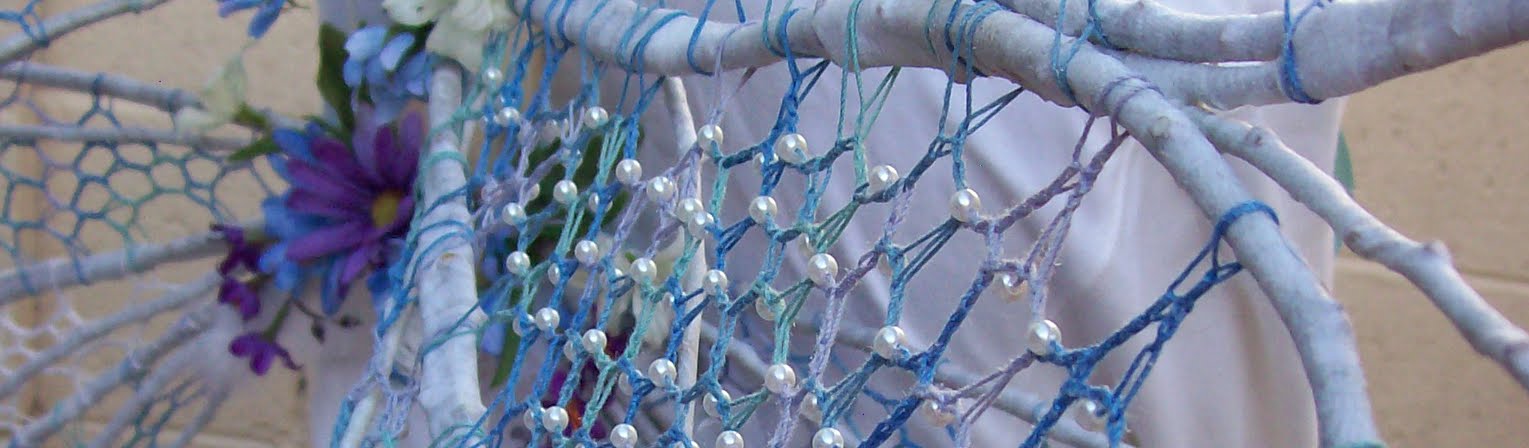
branches covered in plastic. I thought back to a time when I made a dream catcher from a teardrop-shaped branch and went digging through my yarn. Rather than doing a dream catcher knotted pattern, I tried crocheting it to make a more dragon-fly like pattern.
Since there were  12 different "winglets" to fill with design, I varied the theme of the design, adding in glass beads resembling pearls on the upper wings and switching to a yarn that was white with metallic silver filament for the bottom.


When I finished the four wings, I cut a piece of aspen to create the harness. I chiseled off one side so it was flat, then I drilled 4 holes for the wings, 2 holes for the harness straps and 1 hole in back to make it hang on a wall as art when I wasn't wearing it. Then I used hand carving tools and a dremel to custom carve each hole to best fit each wing's branches. When everything was carved, I went back and gave the aspen piece an over-all sanding.


I made a strap from some green twill tape and sewed it so that it fits around my shoulders and rests on my upper back. I then used florist wire and more florist tape to secure the wings to the wood.  
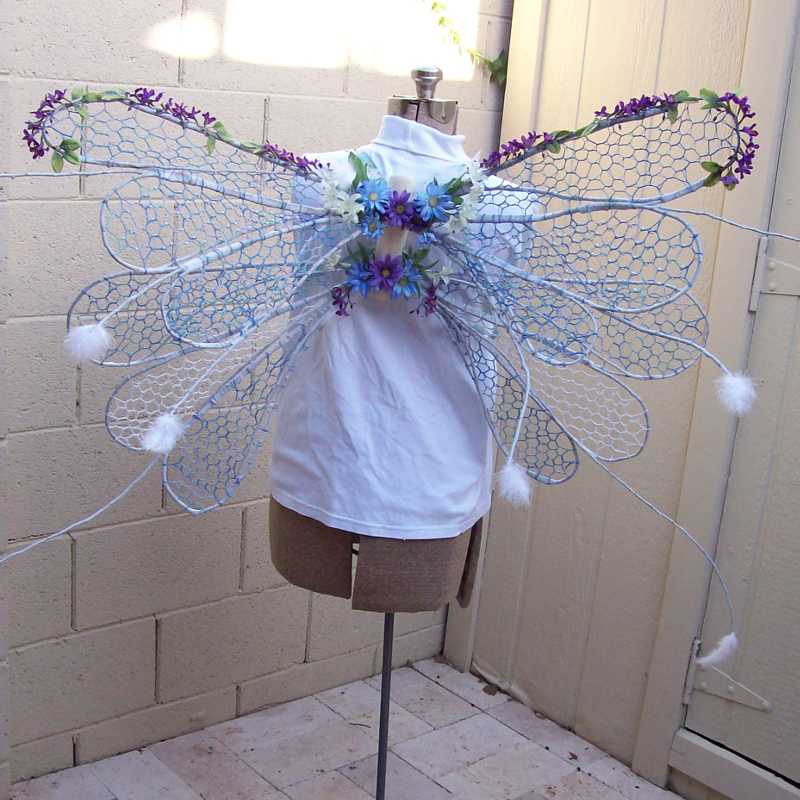
I added in some silk flowers and a few feathers to complete the look. This project took roughly 30 hours to complete.


They look nice on my wall, but I am selling these at the comic con this weekend. They are too hard to ship, so if they don't sell, I will be hanging them back on my wall.

Wednesday, May 27, 2015

Cthulhu Tunic


Another day of amtgard sewing in prep for the Comic Con this weekend. It is interesting how closely related quilting and sewing for amtgard are. I use the same techniques to applique a quilt as I do to embellish a tunic. I was going for something fairly fast and cool for this one because something too cool may be overpriced for a person to buy on a whim.


Cthulhu  is rather popular in the LARP community and any nerdy community, so it seemed like a good choice. I enjoyed the Celtic knot design on this one. I take no credit for the art, as I found this design online, but it was fun and surprisingly fast to sew. It took roughly an hour and a half to trace, cut out and sew the Elder God.


I did have a moment of panic as I sewed when my cone was running out.


I still had much satin stitching to go, but apparently Cthulhu wished his image to be on the tunic and made the thread stretch. I even had enough to finish the neck in black.


I have been playing around with the fancy stitches on my machine more. I liked how this one looks a bit like octopus legs. I also found a good deal on some interesting trims, so I added in the colored ribbon on the sleeve.

Now, the question is, can I finish the dragon tunic before noon tomorrow? Stay tuned to see if I can pull it off!

Tuesday, May 26, 2015

The Other Group, Dandilion Fluff & Foam Feet

I got a commission to make a mascot, and it has introduced me to a whole new sub culture. I did tons of research before starting the project, including attending a fur convention. I was a bit unsure to start, but the more I get involved with the community, the more I learn how fun it all is. Forget CSI and other social media's portrayal and think more about Disney's Robin Hood or Lion King. It's all about people who want to be cute and fluffy.


For those interested in the topic, I will label the posts with Dandilion Fluff (yes, the spelling is on purpose) and fursuit. I created an account on Fur Affinity (which happens to be the best place to discuss the craft and find business in the community), and Sew Honeybee just didn't sound like a fursuit maker's name. I decided that Dandilion Fluff would be more fun. I am planing on making a logo with the i as a dandelion. The above lion is my mascot, drawn by the talented Amanda. She also made a cute face shot for my avatar and business cards as well.


One of the first things I tried was the feet. I did both sets of shoes at the same time (one for outdoors and one for inside). I began with plank foam.


Then I added in high density upholstery foam.


Then I spent time carving, mostly with scissors and a bread knife.


At this point, I thought they looked pretty good and posted them on FA, but then someone suggested I try a different approach to make it easier to walk in and a bit less clompy.


So I redid the carving and ended up with a lot narrower feet. I did have to make them a bit longer to hide the shoe in the toe crack.


The next step is creating a pattern and gluing on the fur. I also have some claws to add. But I changed my tactic and moved to the head while there was already foam all over my craft room. More on the project later.

Monday, May 25, 2015

Pintuck Smocking Wave


Trying new techniques is fun. I've been wanting to try smocking, so for my first project, I figured the fast method of using the machine would be better than trying the craziness of hand smocking (I do plan on doing it on another project)


I began with a one inch grid in pencil (more about the pencil later).


Then I sewed vertical lines with a 1/4 seam allowance.


To get the wave, I sewed all the tucks on the line first one direction than the other.


Then I had a bunch of blasted pencil lines I had to wash out. I really don't recommend using pencil on yellow. My white chalk would have come out easier, but I think it would have killed my eyes. I will go ahead and do it again to the other side, but only because the store is closed and I want to keep going. This project is going to be a cross between an amtgard tunic and a sun dress, based on my park's heraldry.


I was inspired by Lady Armstrong's Designs, which are very impressive. Anyway, more work to do, off to sew!


Tunics! GoT and Butterfly

I finished the GoT/ Empire of the Iron Mountains tunic. It's a big one... likely fits a men's XXL or XXXL.It is the traditional T-tunic shape, so it may be snug in the middle. I did do slits in the sides for the first 6" to help with snugness. Tunic sizes don't seam to matter much, so I am not too worried about making it so large. The person who buys this would likely wear it with a belt anyway. Though I intended to make field wear, this did turn out nice enough to be called court garb.


I hadn't intended on making this one so nice. I found the broadcloth and brocade at the store and thought it would make a nice accent. I had some left over when I finished, so I started to think about what would go well on a teal tunic. I hadn't intended in making it so feminine, but butterflies sounded like they would match the paisley brocade without looking strange, so I went for it.


Surprisingly, adding the butterflies did not add much to my over-all time, and I think they really make it go from a normal T-tunic into something special. For the wings, I used a feather stitch rather than a satin stitch, because I was bored and I thought it would look nice. On the black, I kept to my narrow zig-zag so I wouldn't make the butterfly antenna and body look strange.


I will have both of these at the Phoenix Comic Con and Rakas to sell. If you are interested, please e-mail me for a price quote.

Sunday, May 24, 2015

Songtailor's Studio

   I really need to blog more. I craft almost every day, so I just need to take the 15 minutes to do a photo, upload it and write. I am also going to start tagging things a bit differently. I'll keep up the tags for the quilts and such, but I have two groups I sew for commonly that aren't interested in quilts. One is a fantasy based historic reenactment group (LARP for those in the know) called Amtgard. It is tons of fun and gives me excuses to sew many costumes and other crafty things. I will tag these items with my persona's name... Melody Songtailor.

I will talk about the second group in another post.


Today I was appliqueing this heraldry.  I am still torn between tunic or tabard, so I stopped. It is a cross between the Lannister lion from Game of Thrones and the Empire of the Iron Mountain's. They just did a reign based on the Game of Thrones, so I started this project and never finished.


With Rakas coming up, I figured I should finish it and hopefully sell it to someone who enjoyed the reign. I must admit, being in amtgard has greatly improved my machine applique work!